Access in Prostay is three things stacked, and almost every question about it is really a question about which of the three you are looking at. A person is a user. A user has one role at a property. A role holds permissions. Nothing is ever granted to a person directly, so if you want to give one member of staff something nobody else has, you are making a role, not editing a user.
Three layers, in order
Build them in that order too. Make the roles you need before you invite anybody, because a user has to be given a role at the moment they are created, and the temptation when the right role does not exist yet is to pick Administrator and fix it later. Later does not come.
All three live under Settings, alongside everything else that is configured once and then left alone; Where the settings live is the map if you are not sure which screen owns what.
The people
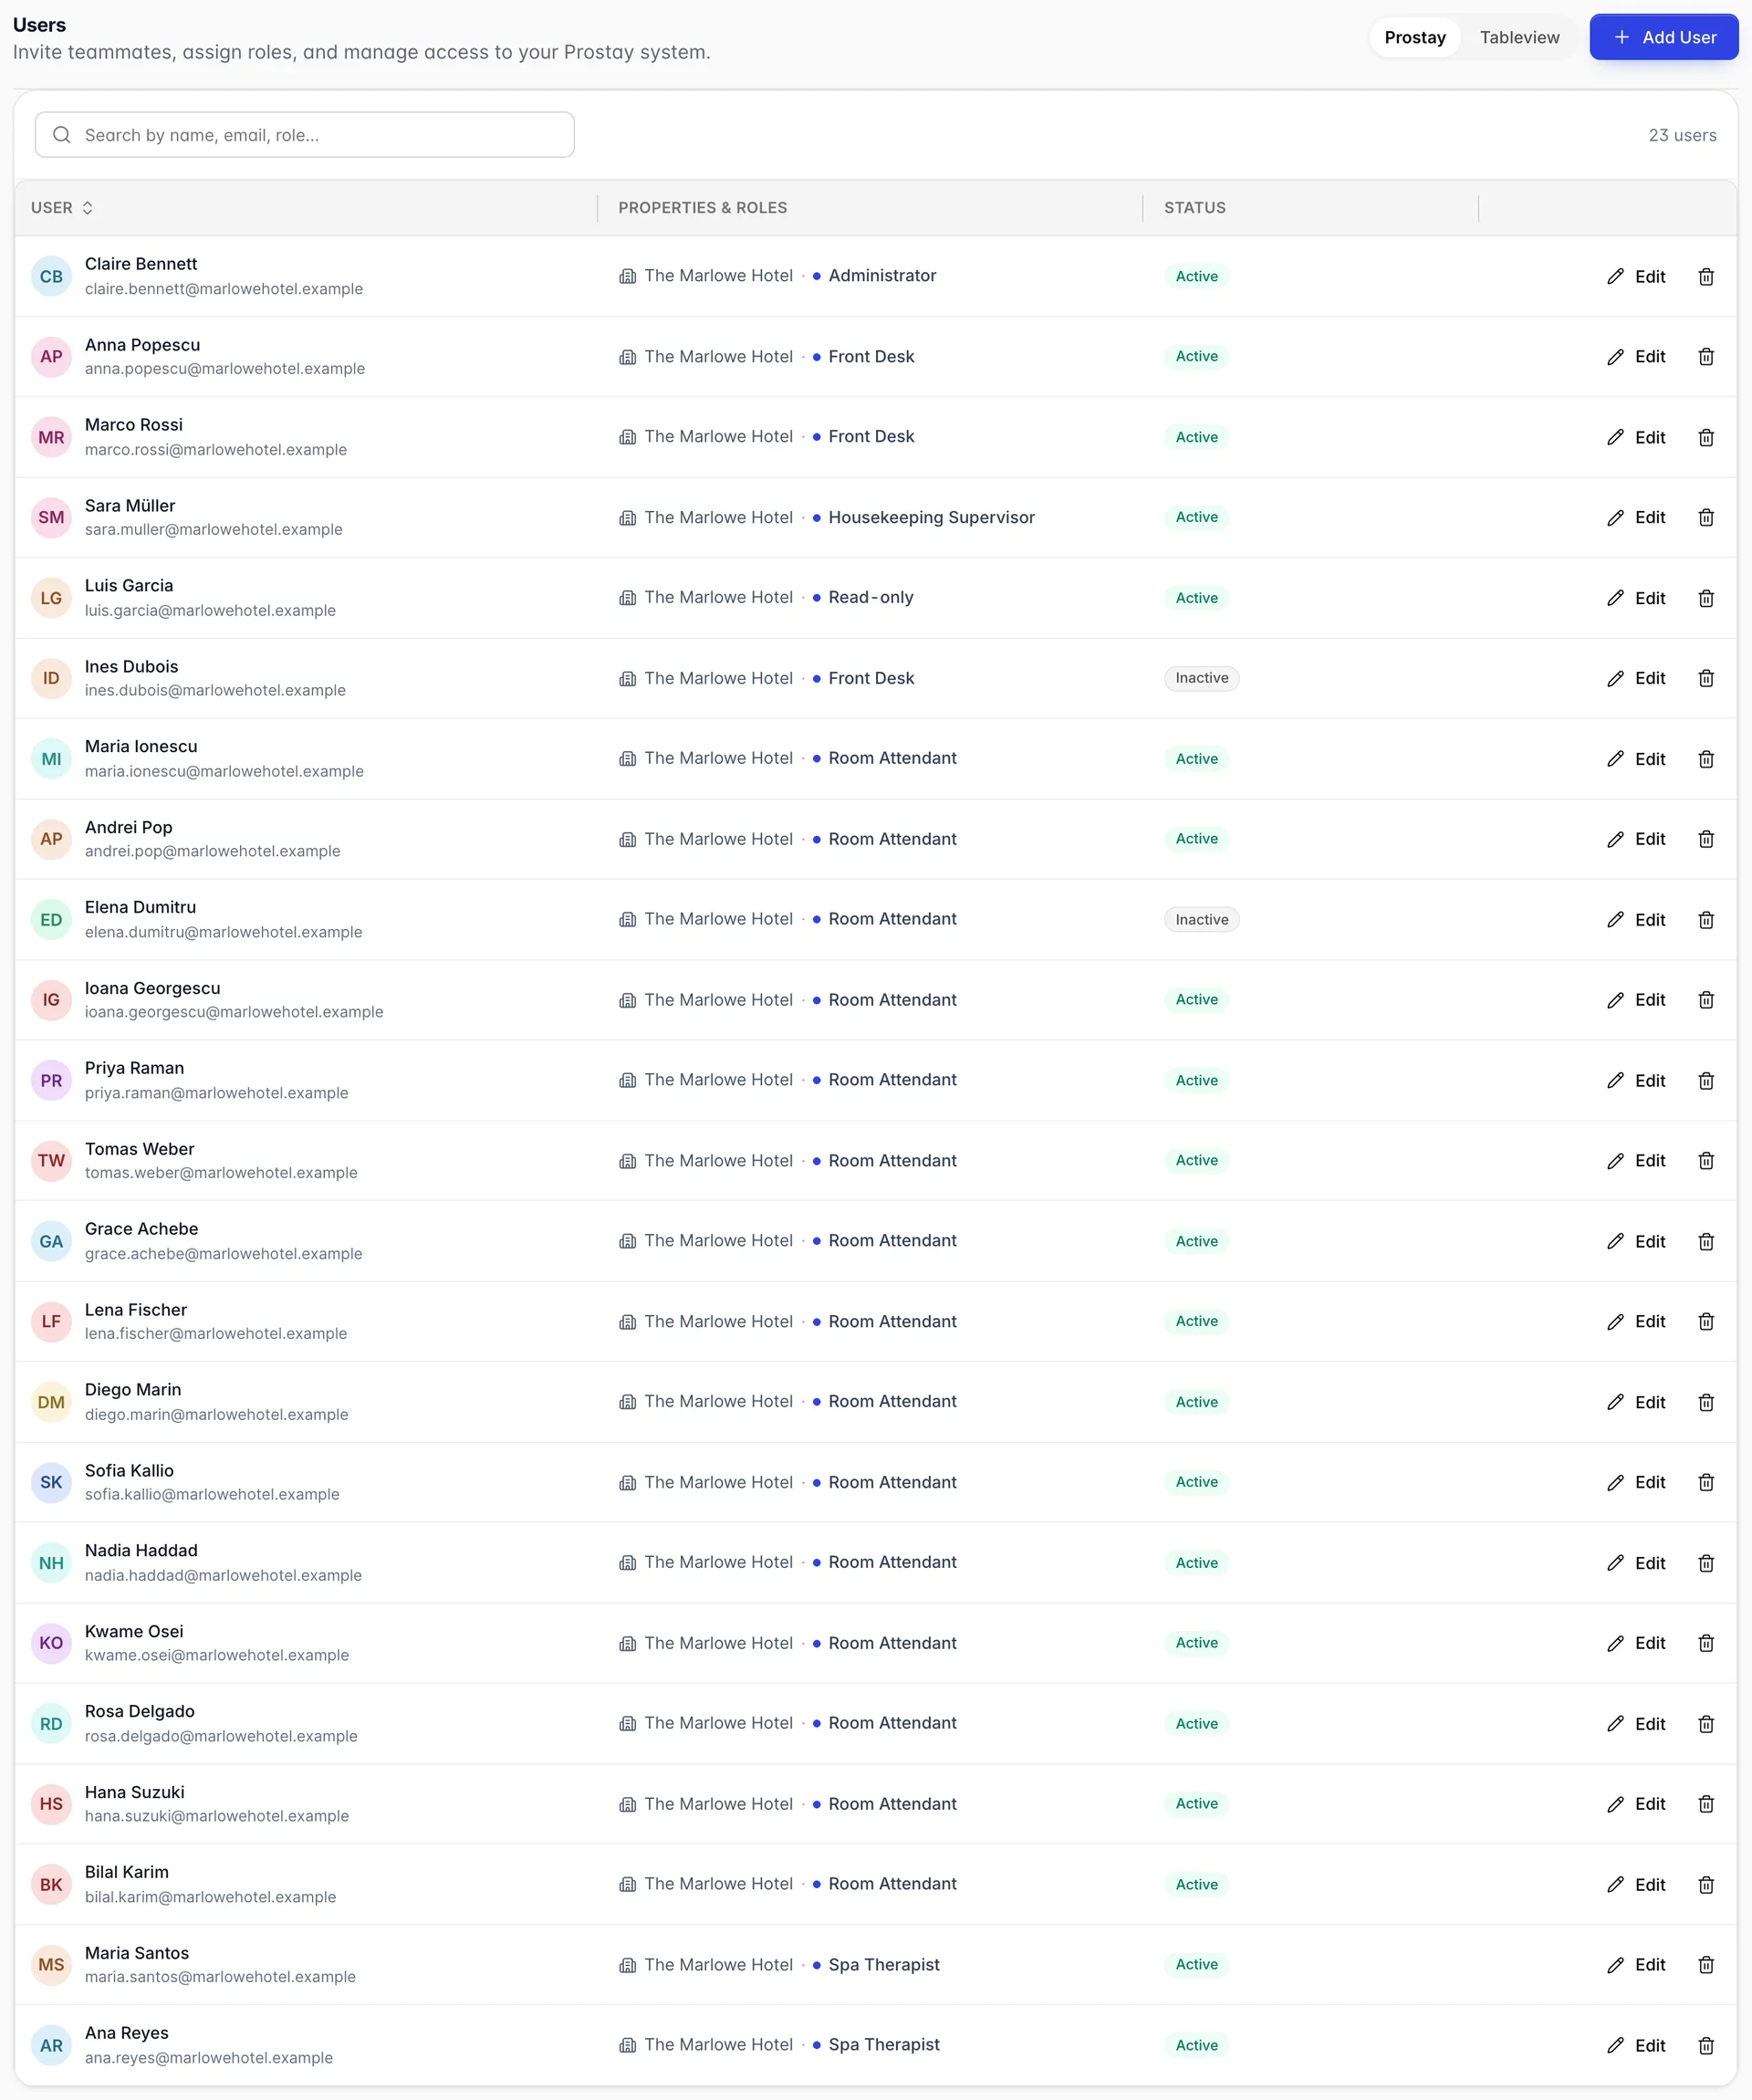
A row is a person: their name, the email they sign in with, the property they work at and the role they hold there. The email is the login, so it has to be one they actually use.
Status is separate from the role. An Inactive user keeps their role and cannot sign in, which is what you want for somebody on long leave or a contractor between jobs. Deactivating is almost always the right move rather than deleting, because the activity log keeps naming them long after they have gone and a deleted user is harder to recognise there.
The Prostay and Tableview control at the top switches between two separate sets of people. Tableview accounts are point-of-sale staff, created through their own path, and their roles are their own set rather than the property roles in the next section. If you are hunting for somebody who is not in the list, check the other tab before you create them again.
The roles
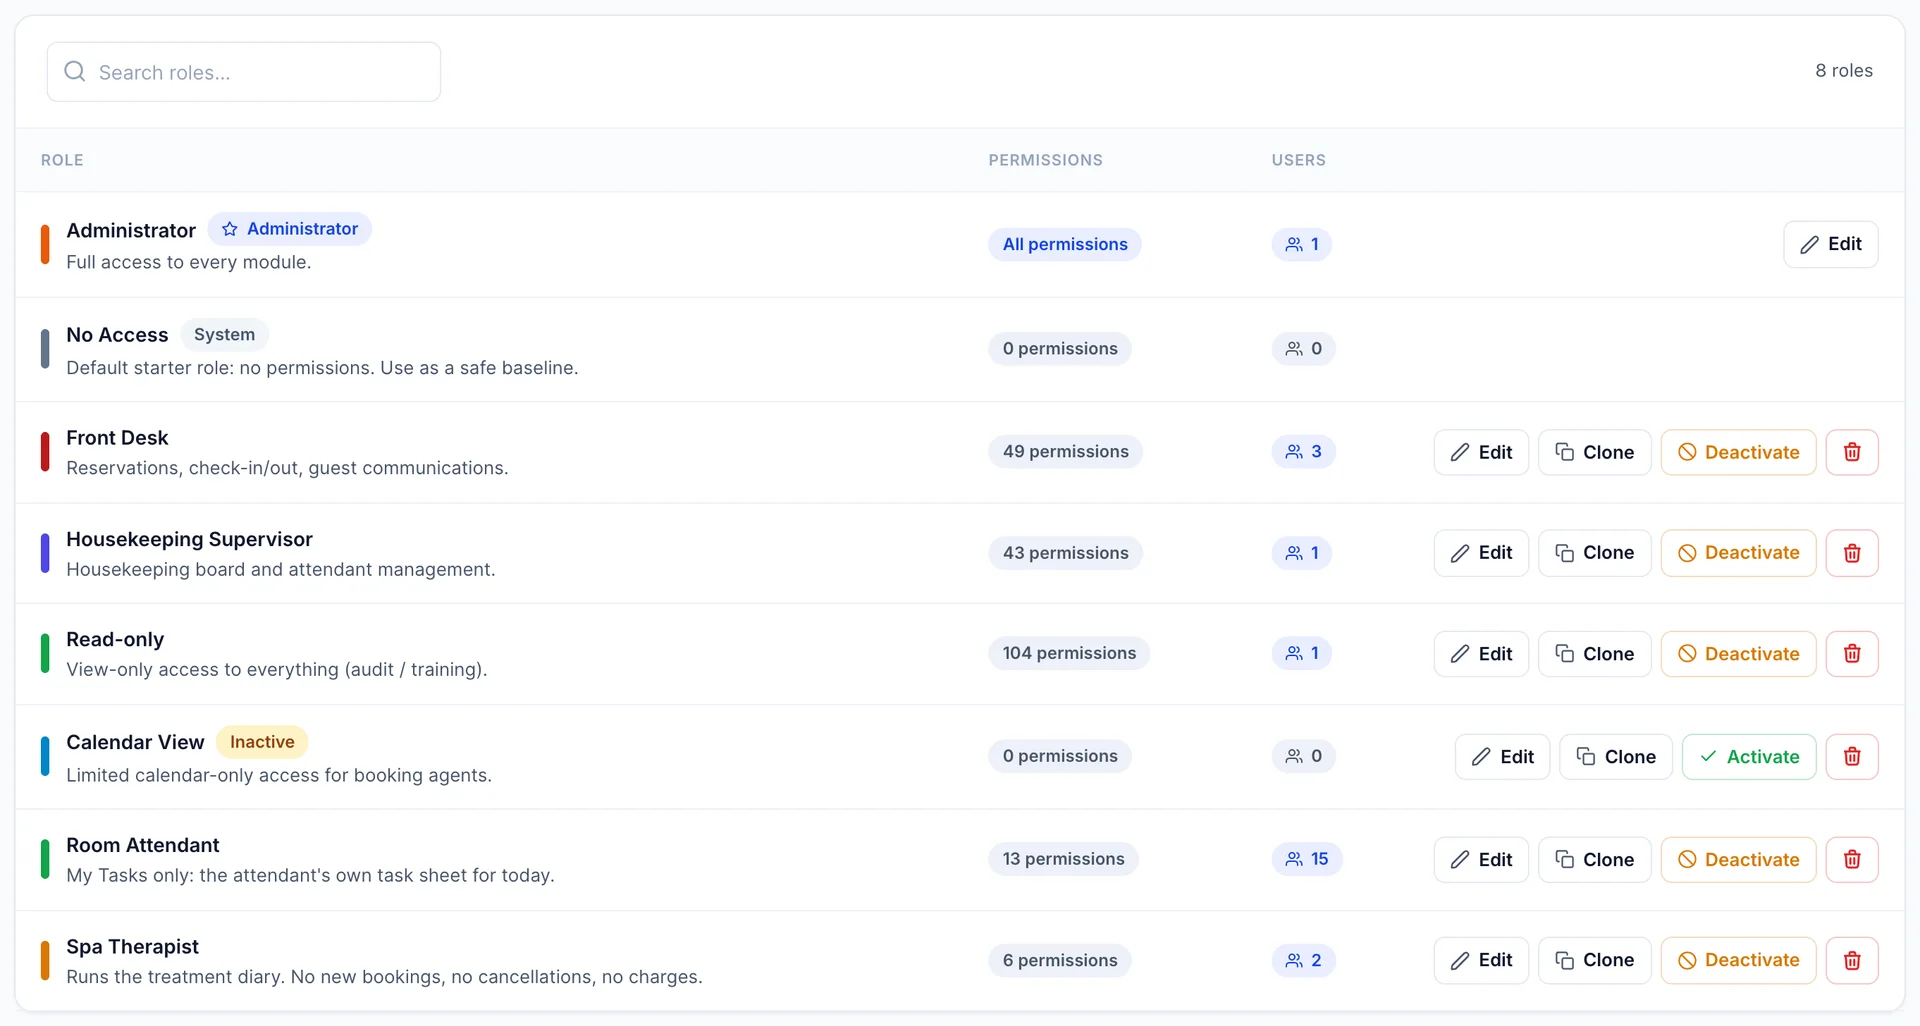
One role per job, described in a sentence a manager would recognise. The description is the only documentation your successor will have, so write it as though for them.
The two counts are the useful part of this screen. The permission count tells you how broad a role is and the user count tells you how much it matters when you change it. Editing a role with fifteen people in it during service is a different act from editing one with nobody in it.
Do not read the permission count as a measure of power, though. In the demo property Read-only holds 104 permissions and Front Desk holds 49, and Front Desk is by far the more powerful role. Read-only holds the ability to look at a great many screens and to change nothing on any of them. A hundred views are worth less than one refund.
Two rows are not like the others. Administrator holds everything and cannot be edited down or deleted, which is deliberate: it is the role that can always fix a mistake made in here. No Access is a system role holding nothing, and it is what to give somebody whose access you want to remove without removing them.
Clone is the fastest safe way to build a role. Copy the one that is closest, then take things away. Building up from nothing means you find out what you forgot when somebody cannot do their job.
Deactivate turns a role off without deleting it and without touching the people assigned to it, which is how you retire a role. Move people to another role first. The switch does not ask.
Making a role
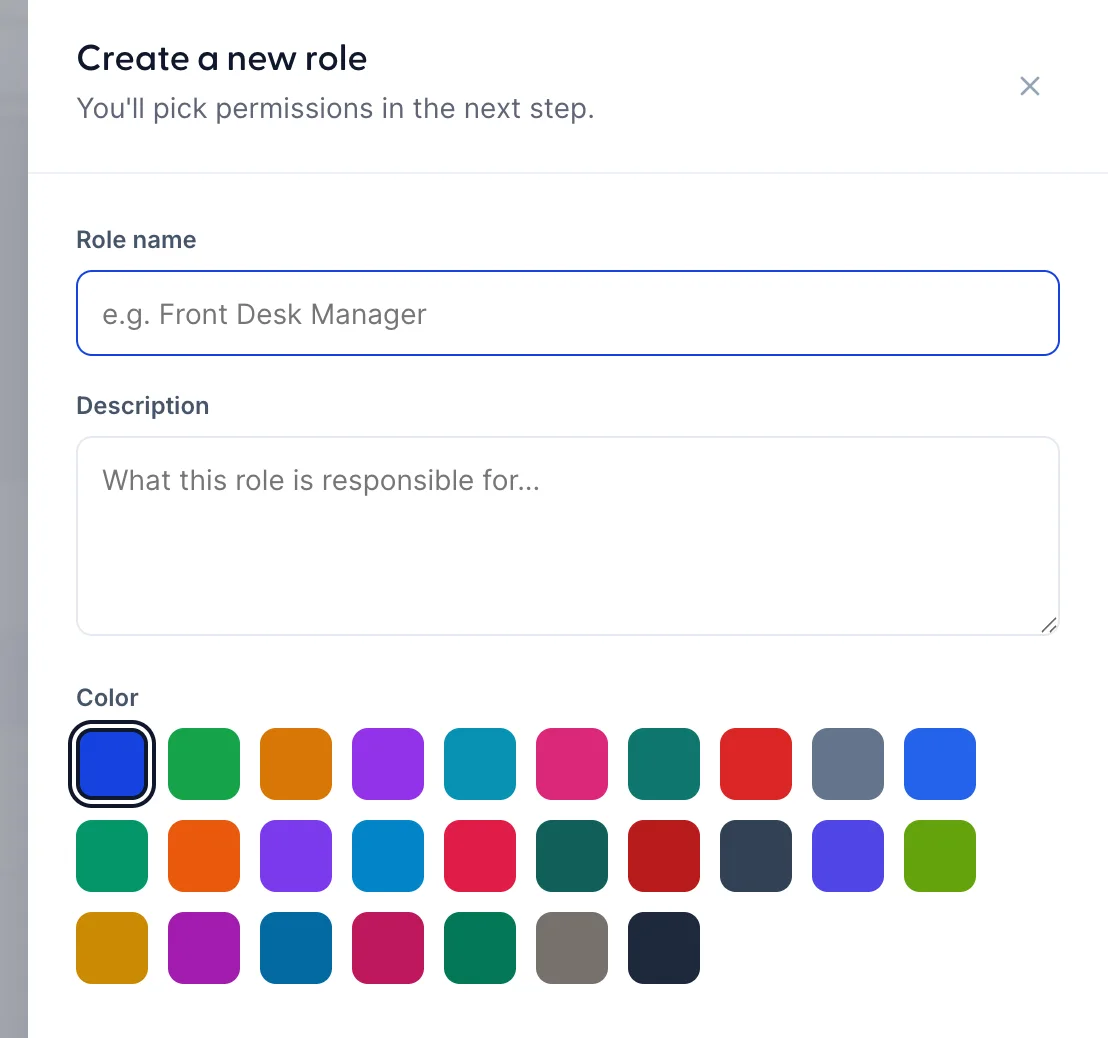
A new role is a name, a description and a colour, and then permissions on the next screen. It starts holding nothing, so a role you create and forget to fill in grants nothing rather than everything.
The colour is not decoration. It is how the role is identified on the roles list and beside each person's name, and picking a deliberate scheme, one family of colours per department, pays for itself the first time somebody scans the users list looking for who is on the desk.
The permission editor
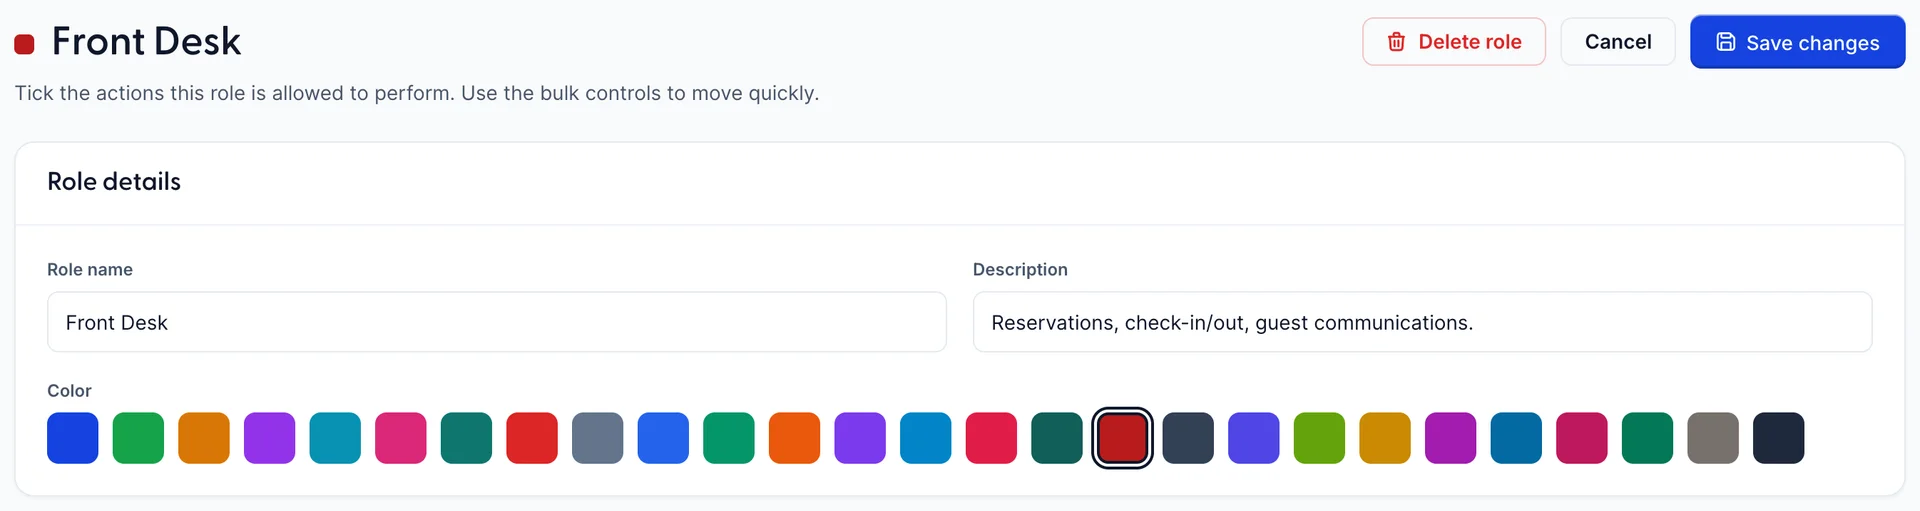
Editing a role opens one screen holding both the role's details and its permissions, saved together by Save changes. Nothing is written until you press it, so you can move around the modules freely and leave without consequence.
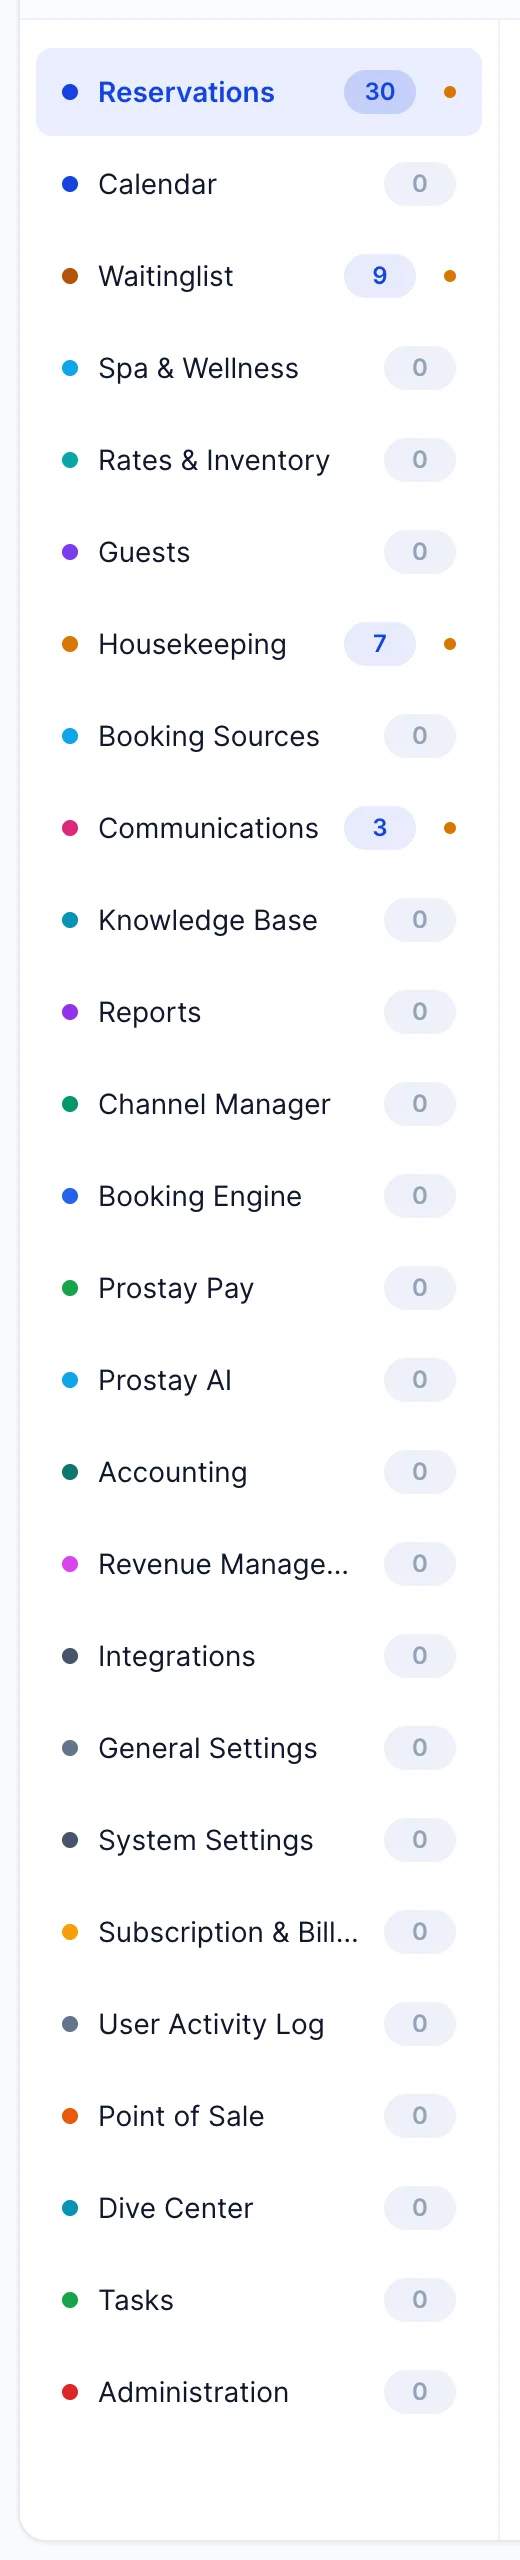
The rail down the left is twenty-six modules, and the number beside each one is how many permissions the role holds inside it. Read the rail before you read anything else. Front Desk above is 30 in Reservations, 9 in Waitinglist, 7 in Housekeeping and 3 in Communications, and nothing at all in the other twenty-two, which is the shape of a well-drawn role: a few modules held properly and the rest untouched.
A grey 0 means the role holds nothing in that module and the amber dot means it holds some but not all of it. A module with no dot and a number is one the role holds completely.
Resources, actions and the two chips
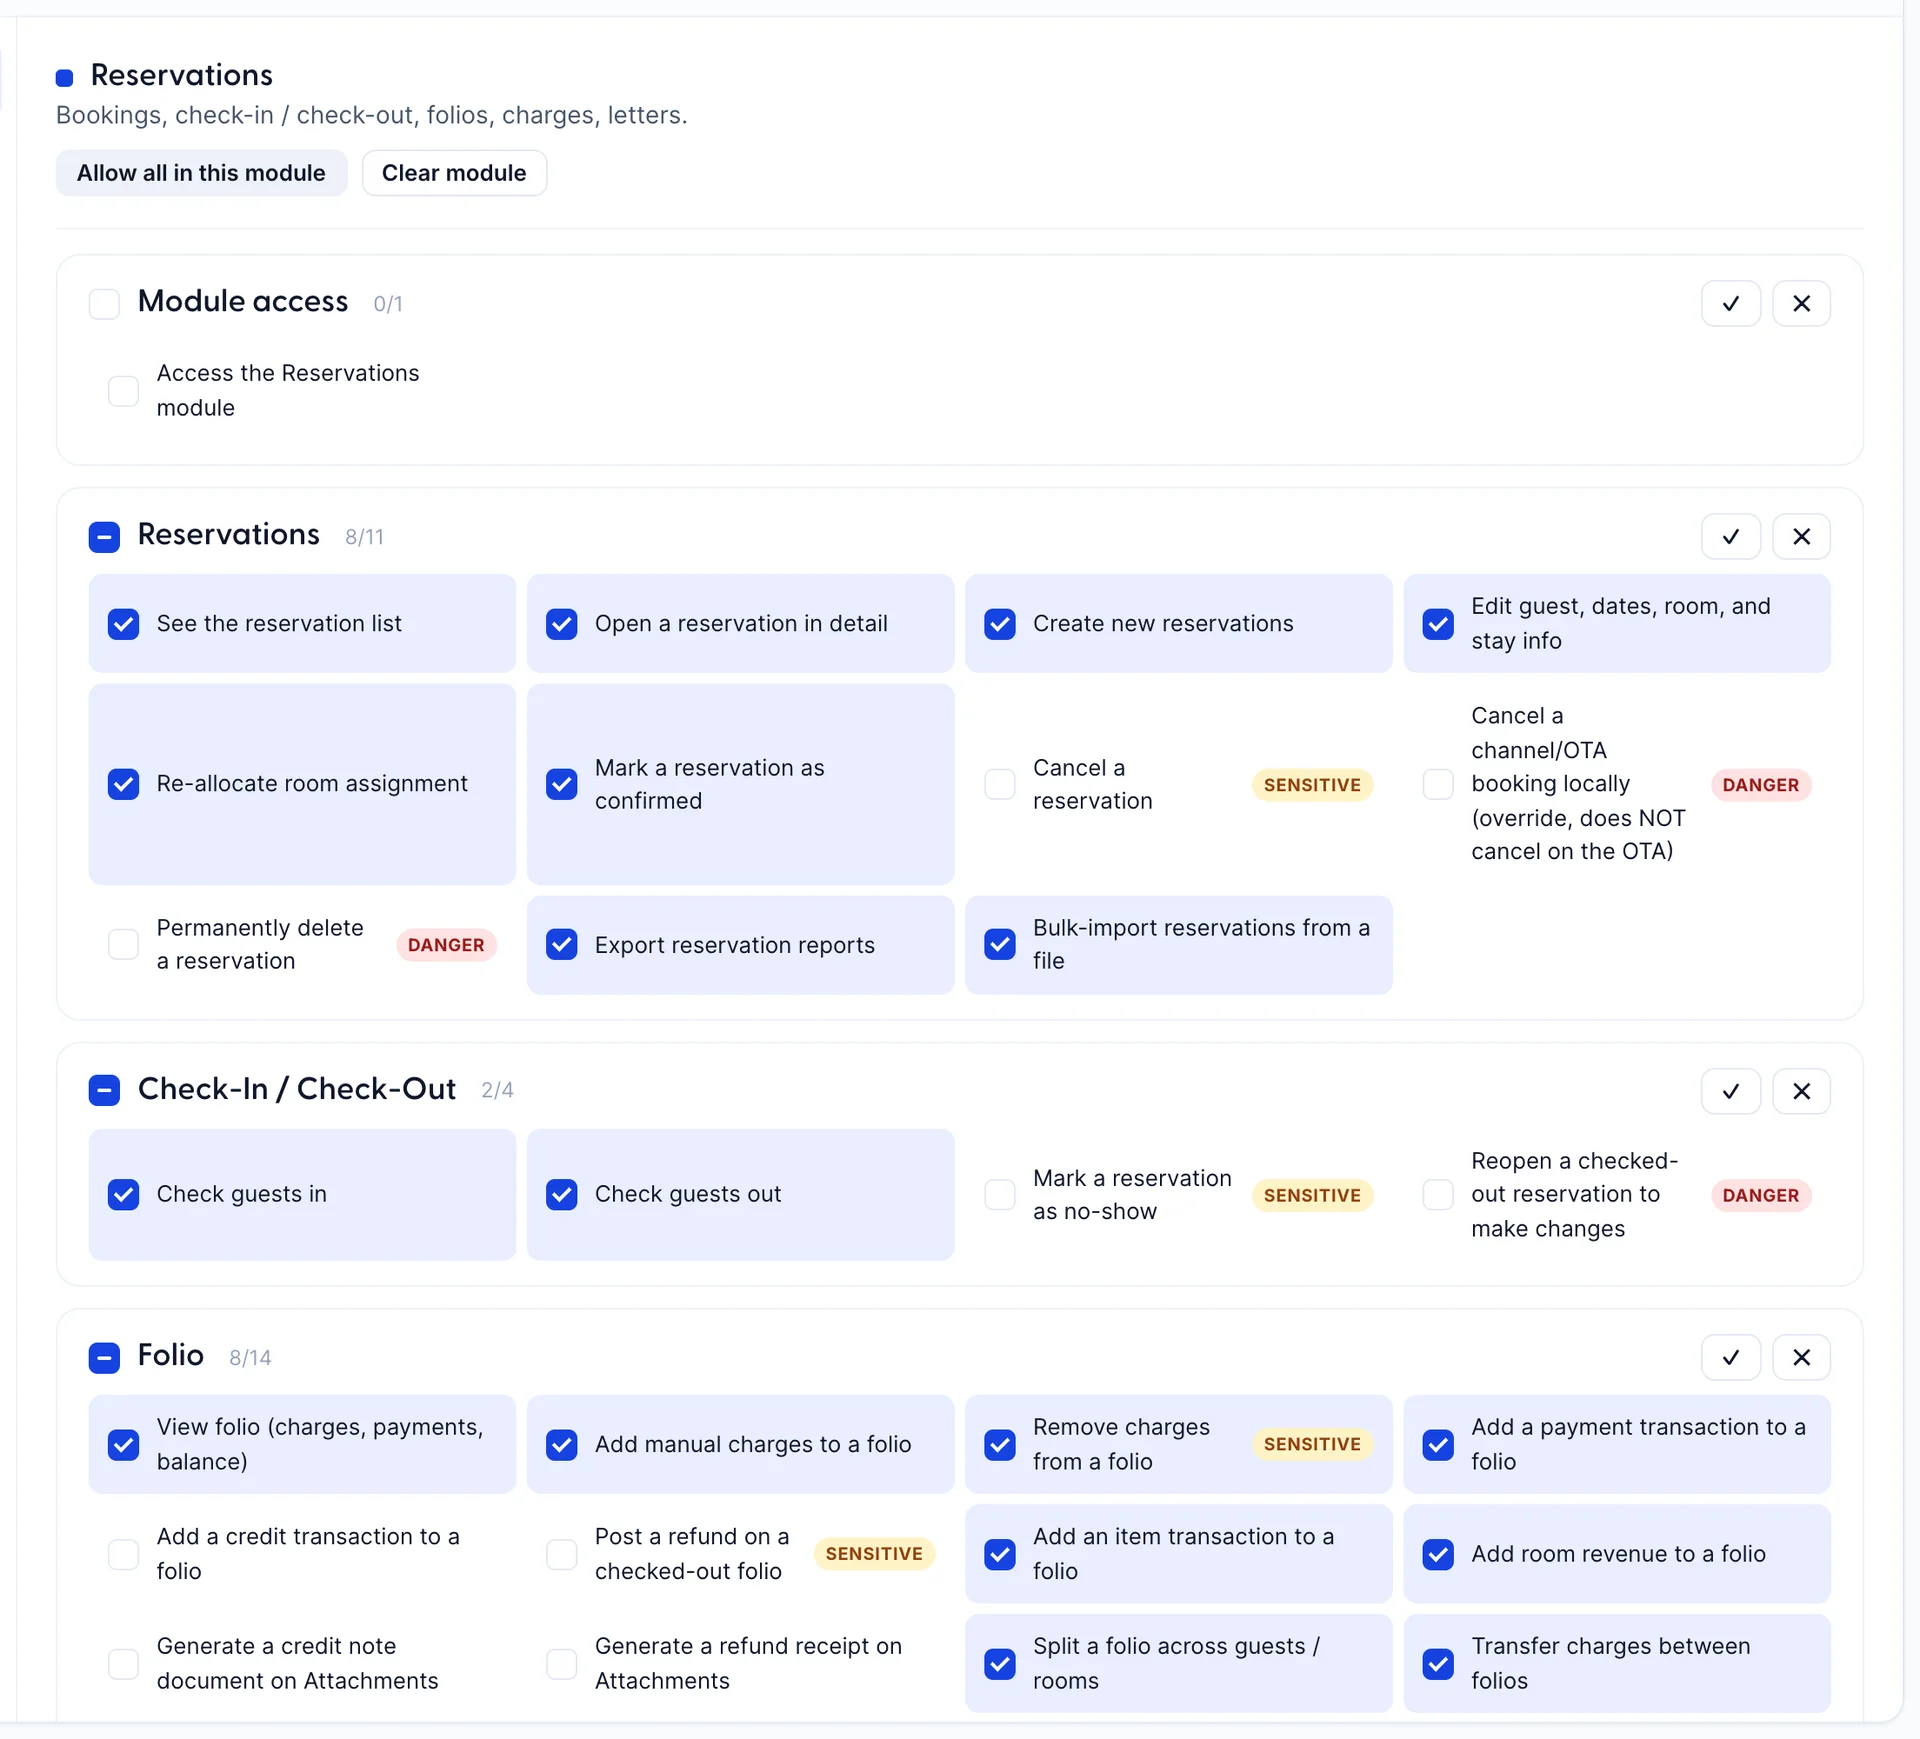
Inside a module, permissions are grouped by the thing they act on. In Reservations those groups are the reservation itself, check-in and check-out, the folio, house accounts, pricing and discount overrides, turnaways, the waiting list and so on, and each group lists its actions one per checkbox.
Every action is one ability, named. This is the important difference from the screen this replaced: you no longer decide whether a job needs Edit on something and hope Edit covers the right things. Check guests in and Check guests out are two separate ticks, and so are Add manual charges to a folio and Remove charges from a folio. Grant the sentence that describes the job.
The controls for moving quickly are the block checkbox beside each resource, the tick and cross buttons at the right of it, and Allow all in this module and Clear module at the top. Allow all and then take away is usually faster than the reverse, and it has the advantage of making you look at every action once, but do it before you save rather than as a way of finding out what is in there.
Finding one permission
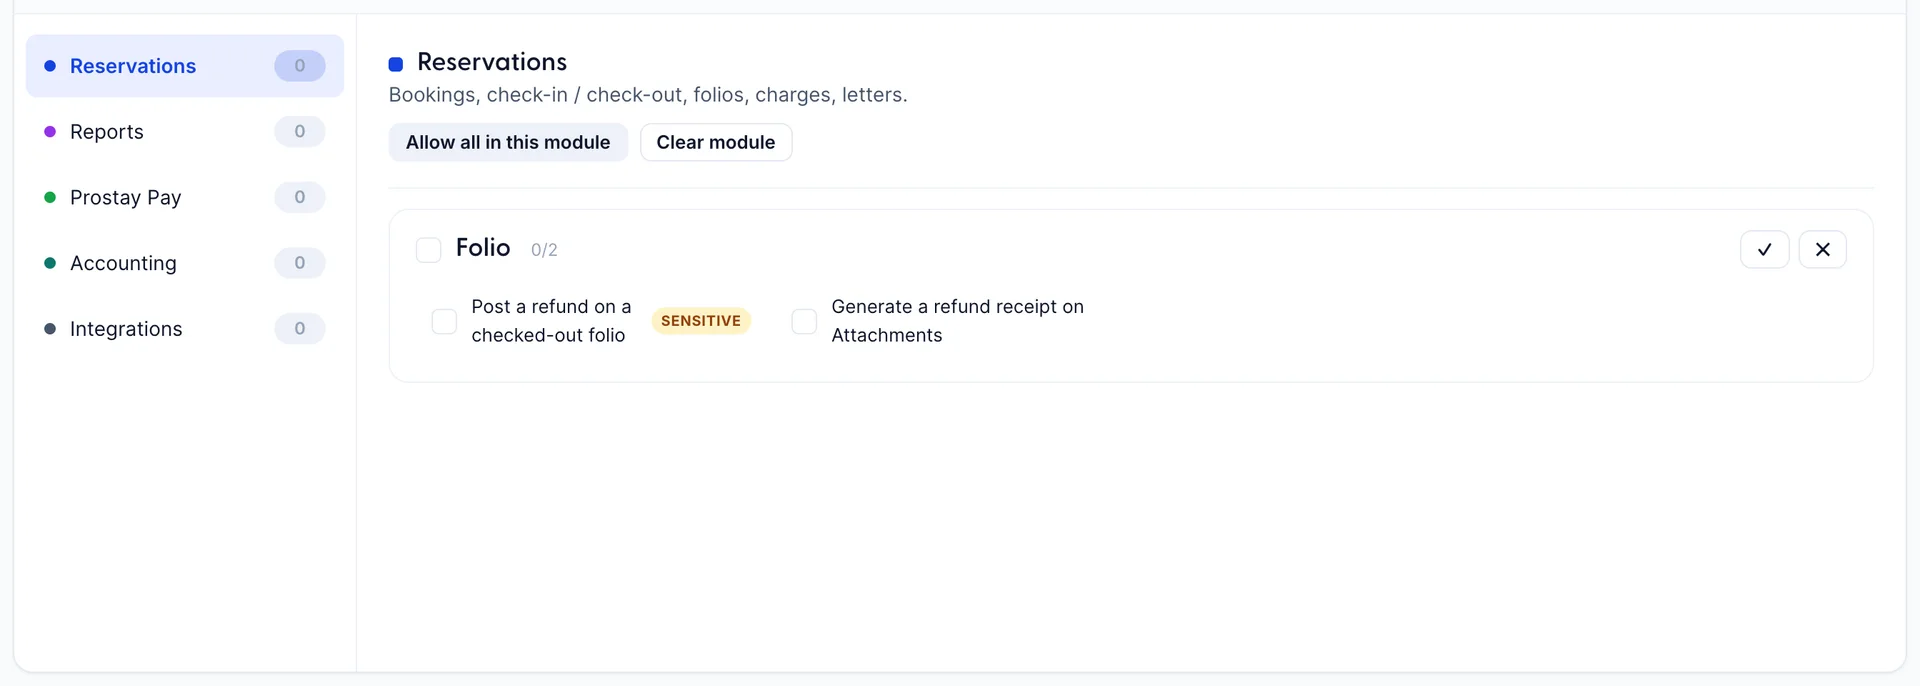
Nobody arrives at this screen wanting to browse. They arrive because somebody cannot do something, or should not have been able to. Type the thing into the search box and both the rail and the blocks narrow to what matches, so refund tells you in one read that refunds are mentioned in five modules and that this role holds neither of the two in Reservations.
Search the verb the person used rather than the module you think it lives in. discount, void, override, export and delete each pull together permissions from modules you would not have thought to open, which is exactly the point of it.
A worked example: a narrow role
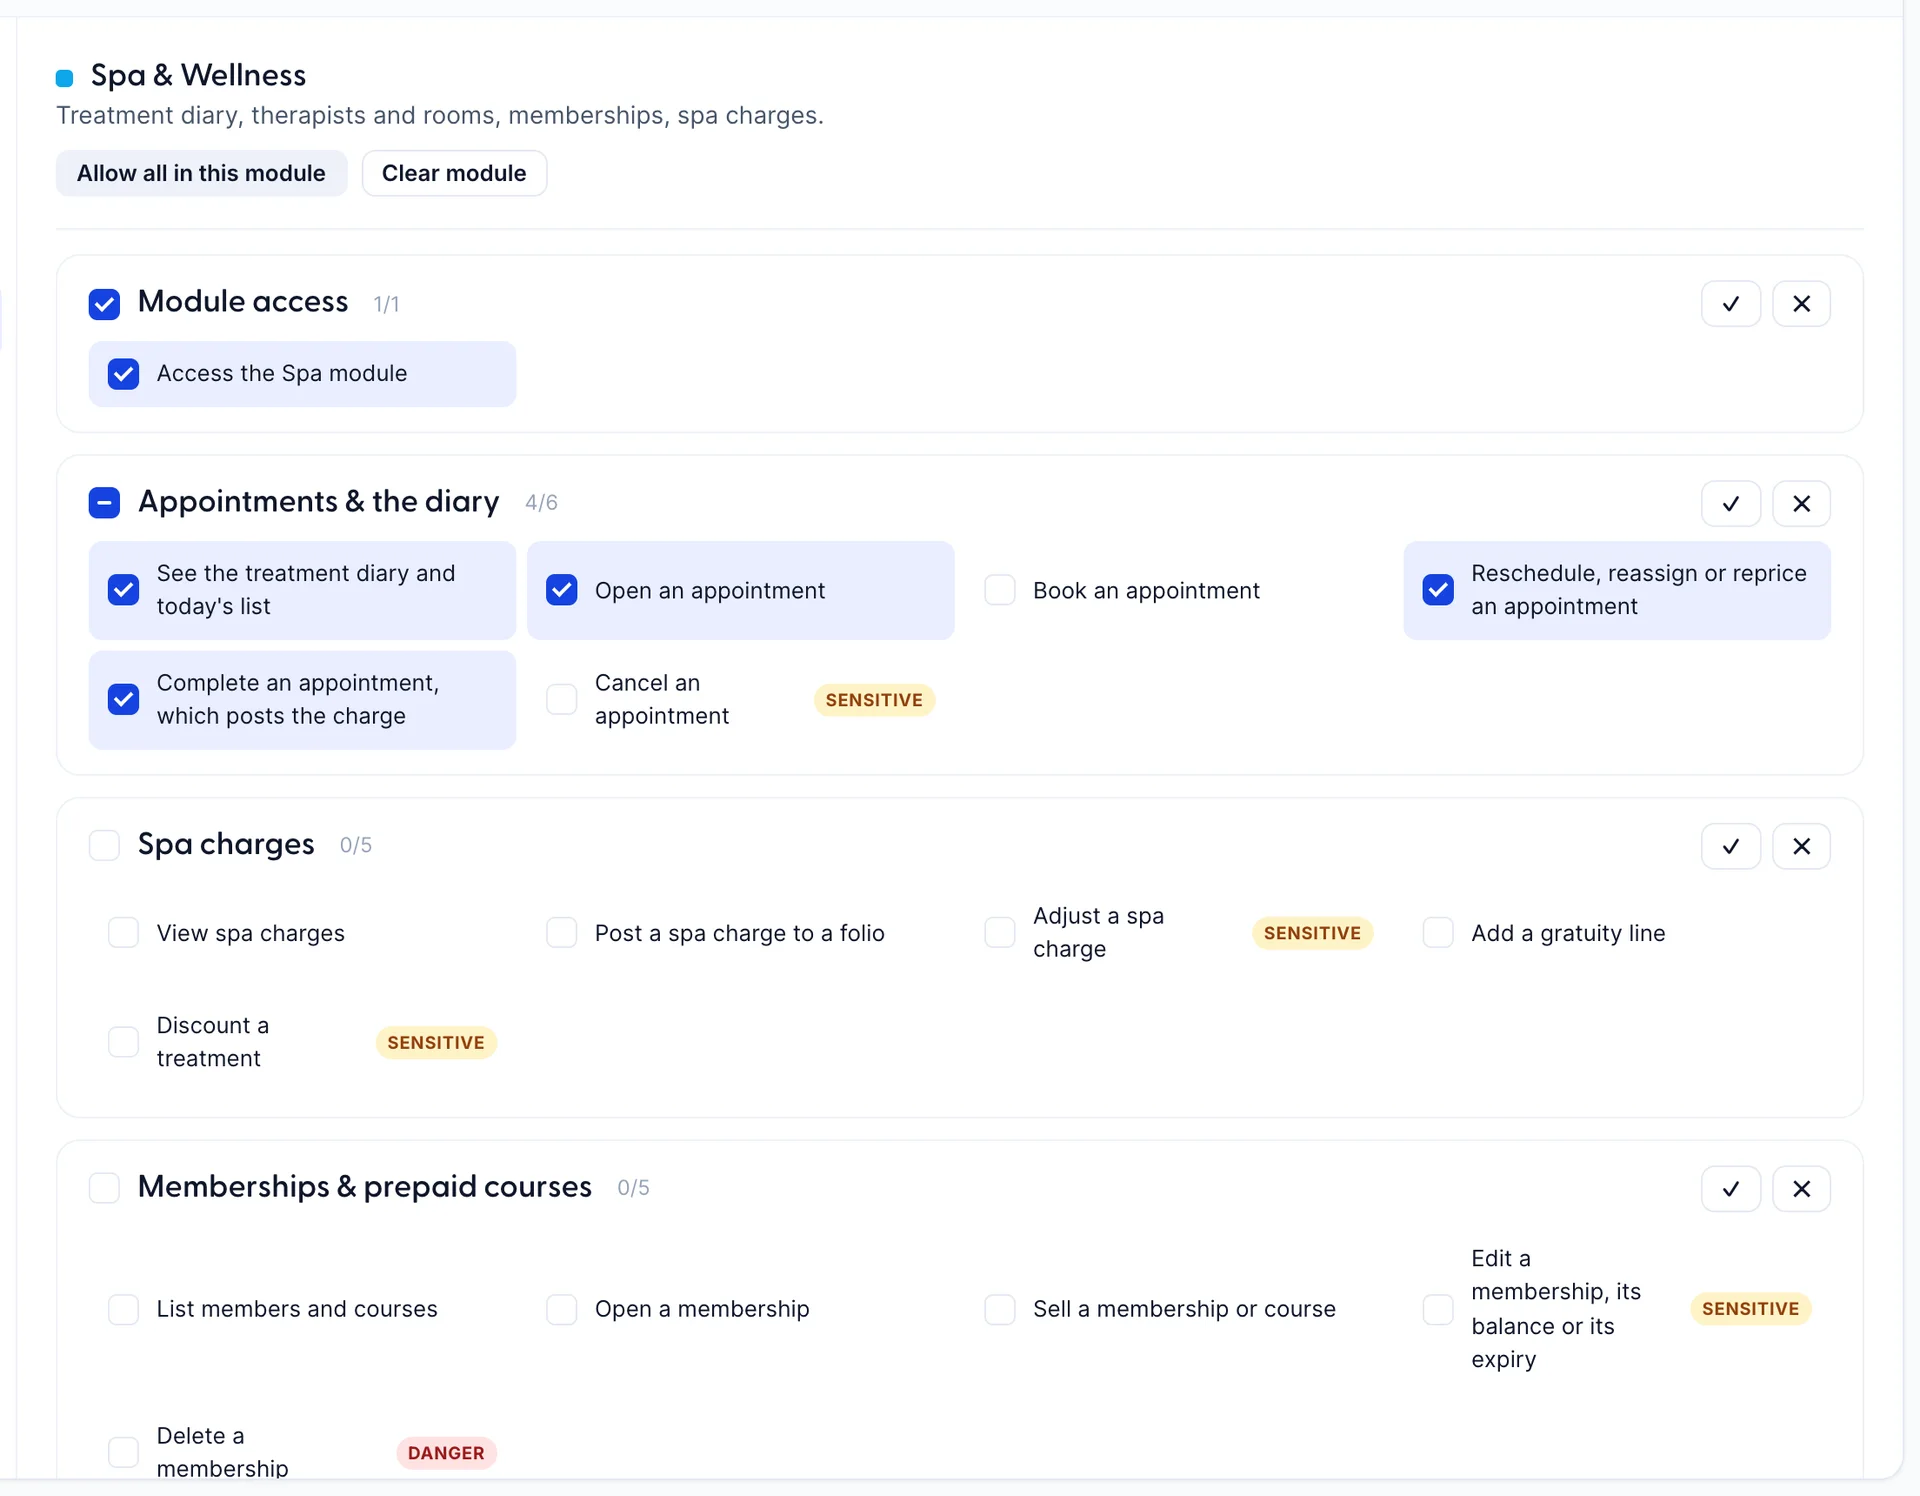
The Spa Therapist role is six permissions and worth copying as a pattern. The therapist can see the diary, open an appointment, move or reprice one and complete one, which posts the charge. They cannot take a new booking, cannot cancel one, and hold nothing on charges or memberships.
Notice what that separation buys. Completing a treatment posts money to a folio, so it is real authority, and it sits next to Cancel an appointment, which the role does not have. A role designed as "the therapist needs to edit appointments" would have granted both. Six named ticks describe the job better than one verb applied to a noun.
The whole catalogue on one page
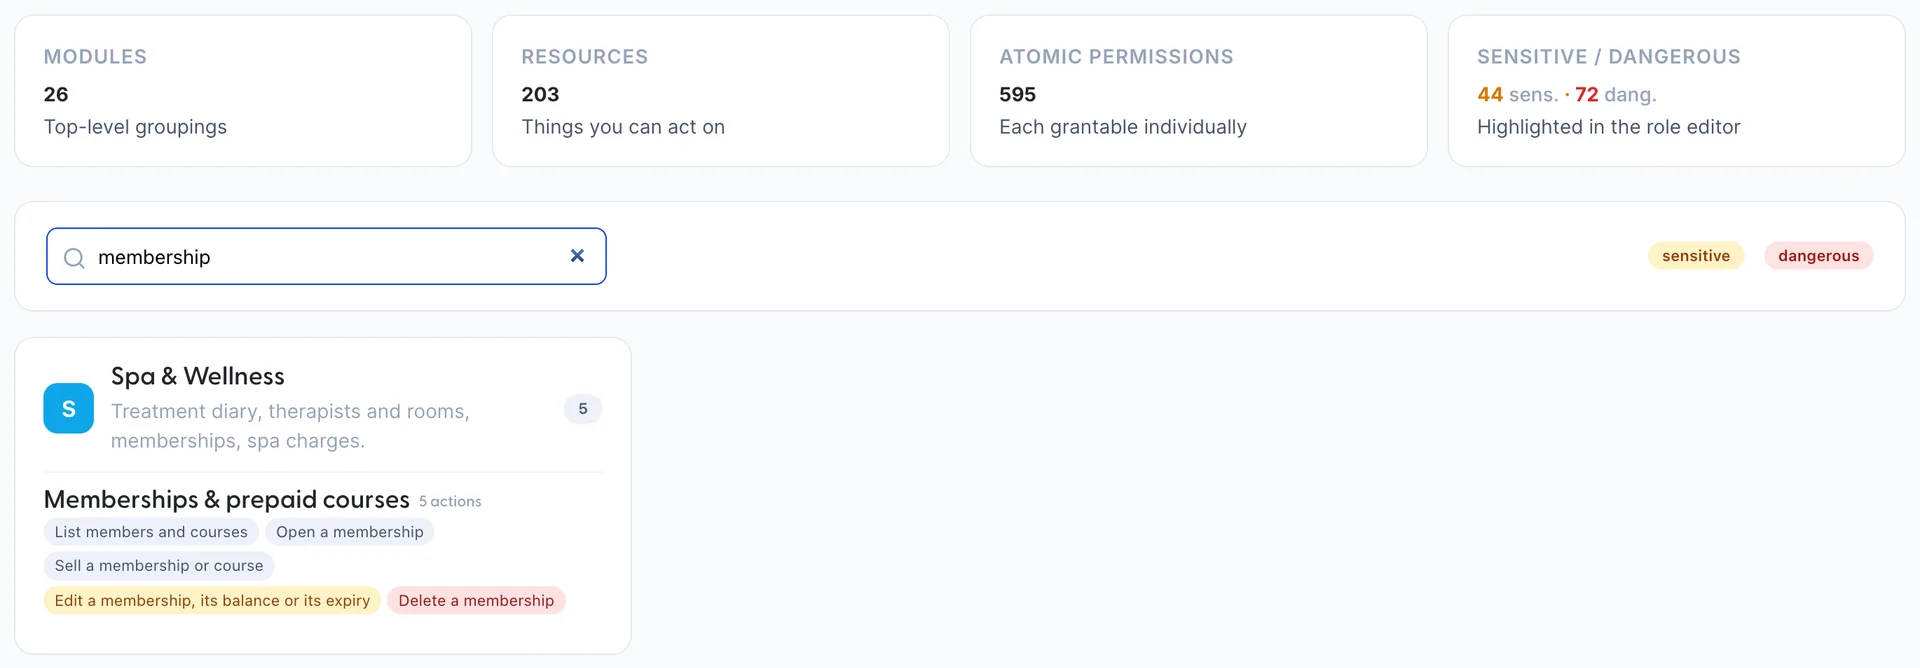
Permissions catalog, under Users, lists every permission that exists: 595 individual abilities, grouped into 203 resources across 26 modules. It grants nothing and changes nothing. It is the reference you read while deciding what a role should hold, away from the checkboxes that would let you change one by accident.
It is also the honest answer to "what can this product actually do", which is a harder question to answer from the menus. If you are writing down what each job at your property is allowed to do, do it here first and tick afterwards.
If you knew the old screen
This screen used to be nine module blocks on one page, each a table of permissions with Create, Edit, View and Delete boxes. Three things changed that are worth knowing if you had learned it.
- Four verbs became named actions. Where a row offered Edit, there are now separate ticks for the things Edit used to cover. Nothing you granted has been taken away, but a role that had Edit on something now shows several ticks rather than one, which is why permission counts look larger than you may remember.
- The settings permissions moved out of Reservations. They used to be grouped there because they all affected what a reservation costs. They now sit under the module they belong to: taxes and fees, invoicing settings and payment options are under Integrations; policies and accommodation types are under General Settings; managing users and roles is under Administration. If you learned the old layout, this is the one that will cost you a few minutes.
- Guest card data is now three permissions rather than one. Viewing masked card data, viewing or decrypting the full number, and charging a stored card are granted separately, under Reservations › Guest Credit Card data. Under the old single row, anybody who could see a masked number could see all of it. Check who holds the middle one.
Why a change sometimes does not take
Permissions are cached in the browser after sign-in. When you change a role, the people already signed in under it keep the access they had when they signed in, and keep it until they sign out and back in. Nothing tells them, and nothing tells you.
So a permission change is not complete when you press Save changes. It is complete when the affected people have signed in again. If you have just removed somebody's access to something for a reason that matters, tell them to sign out, or sign them out yourself. Signing in and finding your way around covers what a person sees on the way back in, which is the moment the new role actually takes hold.
Common pitfalls
- Reading the permission count as power. Read-only holds twice as many permissions as Front Desk and can do none of the things that matter. Count the sensitive and dangerous ticks instead.
- Assuming a role change is live. It is live at the next sign-in for anybody currently in the product, and not before.
- Giving Administrator as a placeholder. A user needs a role at creation, so the wrong role gets chosen under time pressure and never revisited. Make the roles first, or give No Access and come back.
- Using Allow all in this module to see what is in it. It ticks everything, including the dangerous rows. Use the catalogue page to look, and the module to grant.
- Switching a role off with people still in it. Move them first. The switch does not ask.
- Deleting a user instead of deactivating them. The activity log names them for years. Deactivate, so the name still resolves.
- Granting the Administration module casually. It is the module that contains this screen, so it is the permission that grants permissions.