A confirmation letter is what you send a guest once their booking is confirmed: the dates, the room, what it costs, and whatever your property wants to say alongside that. You design it once as a template, and every letter you send afterwards fills that template in from the reservation.
It is one of two guest documents built the same way. The other is the registration card, which is the form a guest signs at the desk on arrival. This article covers the builder in full, because both documents use it.
What a confirmation letter is
Two things are worth separating before anything else, because the screens look similar and mixing them up is the most common confusion here.
- A template is a design. It says a letter has the guest's name here, the check-in date there, and this paragraph of house wording at the top. It contains no guest and no dates.
- A letter is what a specific guest receives. It is produced when somebody opens a reservation and sends one, by taking a template and filling it in from that booking.
So you are never editing a guest's letter. You are editing the design that every future letter will be made from, which is why a change here quietly changes what the next hundred guests read.
Templates, and which one is the default
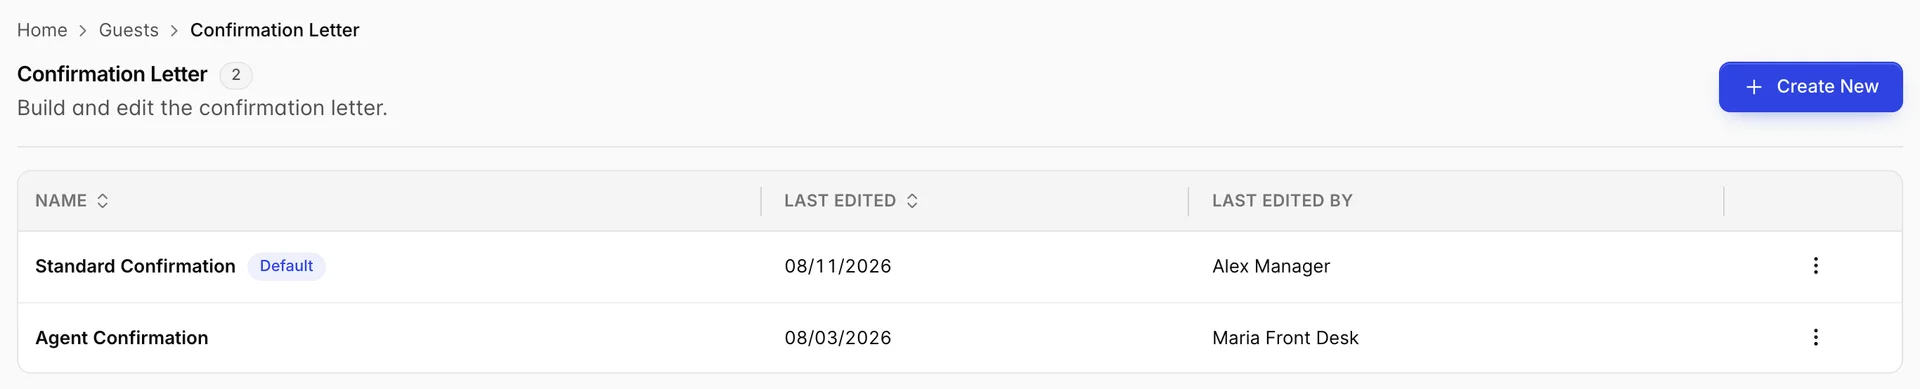
Most properties need more than one. A letter to a guest who booked direct and a letter to a travel agent who booked on somebody's behalf are addressed to different people and say different things, so they are two templates rather than one template with awkward wording.
Last edited and Last edited by are more useful than they look. A letter that has started going out wrong is nearly always a letter somebody changed, and this is where you find out who to ask.
The row menu at the right of each row holds four actions, one of which is worth thinking about before you use it:
- Edit opens the builder.
- Duplicate copies the template. This is how you should start a variant. Duplicating the letter that works and changing two lines is safer than building a second one from nothing and discovering in a month that it never had your cancellation wording.
- Set As Default moves the default badge to this template. It appears only on templates that are not already the default.
- Delete removes the template. Letters already sent are unaffected, because they were generated at the time; only future letters lose the design.
The builder: sections, columns and tiles
This is the part shared with the registration card, so it is worth learning once properly.
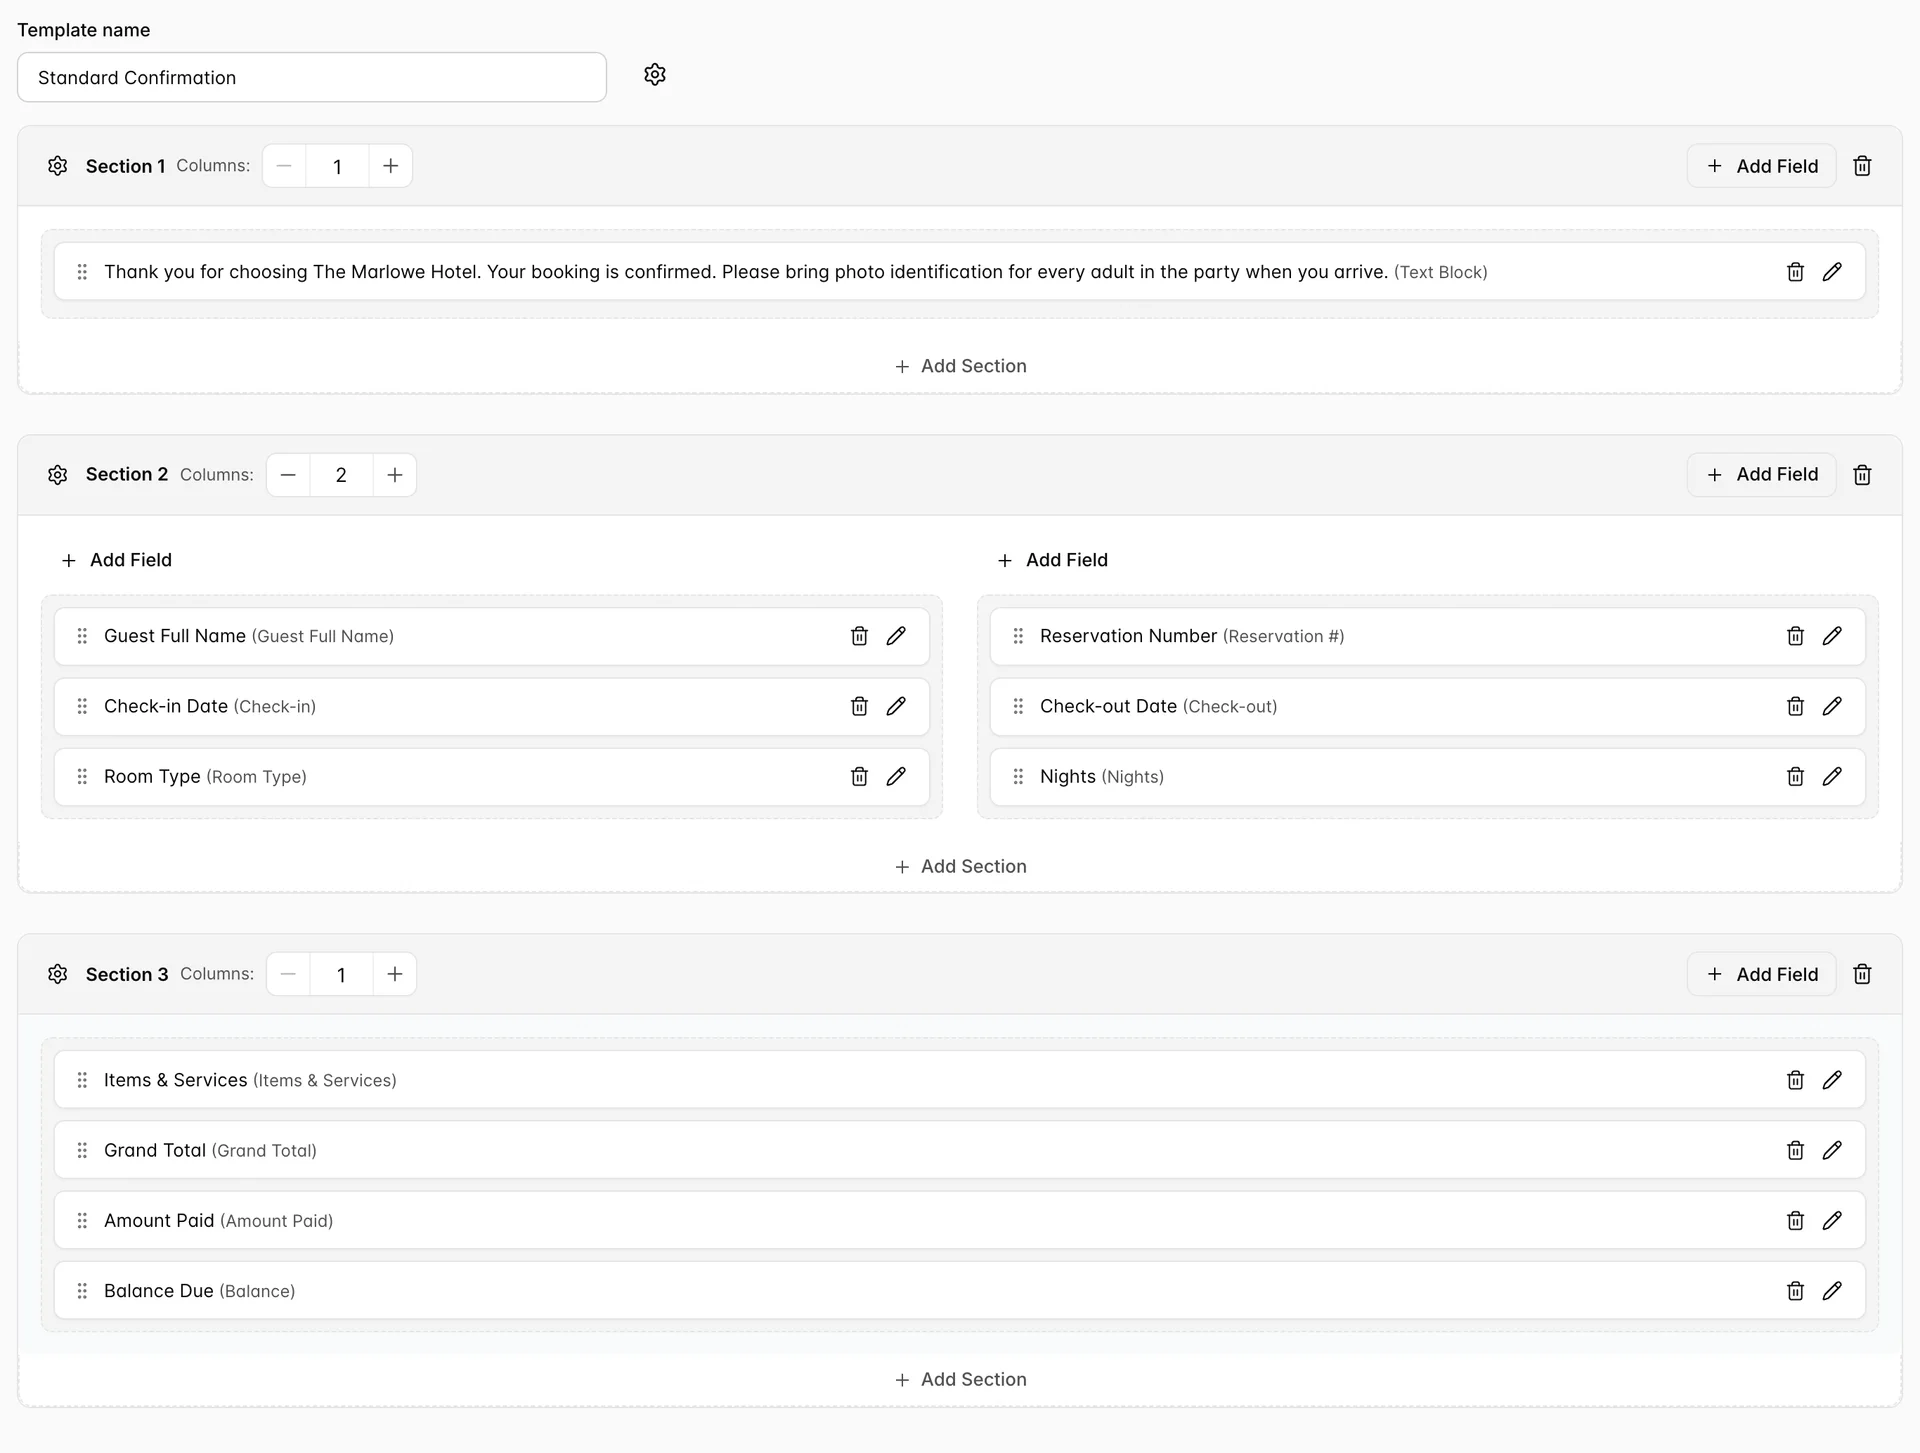
Three ideas, and the whole builder is these three:
- A section is a horizontal band of the document, top to bottom in the order you see them. Add Section under any section adds another below it.
- Columns on a section decides how many columns that band is split into, from 1 to 12. It is set per section, not for the document, which is what lets a one-column paragraph of wording sit above a two-column grid of booking details. Two or three is usually as far as you want to go on something a person has to read.
- A tile is one field. Each tile shows its own name and then, in brackets, the type of thing it is: Guest Full Name (Guest Full Name) in the picture, or Check-in Date (Check-in) where somebody has renamed it.
The name and the type in brackets are the distinction that matters most. The type decides what gets printed. The name is only the label, and you can change it freely: rename Check-in to Arrival and the letter still prints the arrival date, because the type underneath is untouched.
The controls on and around a tile:
- The handle at the left drags the tile, within a column or across to another. The order of tiles is the order the guest reads them.
- The pencil opens that field's settings, which is where you rename it.
- The bin removes it from the template.
- Add Field appears twice, once in the section header and once at the top of each column. They do the same thing; the one in a column adds the field to that column, which saves dragging it there afterwards.
The field catalogue
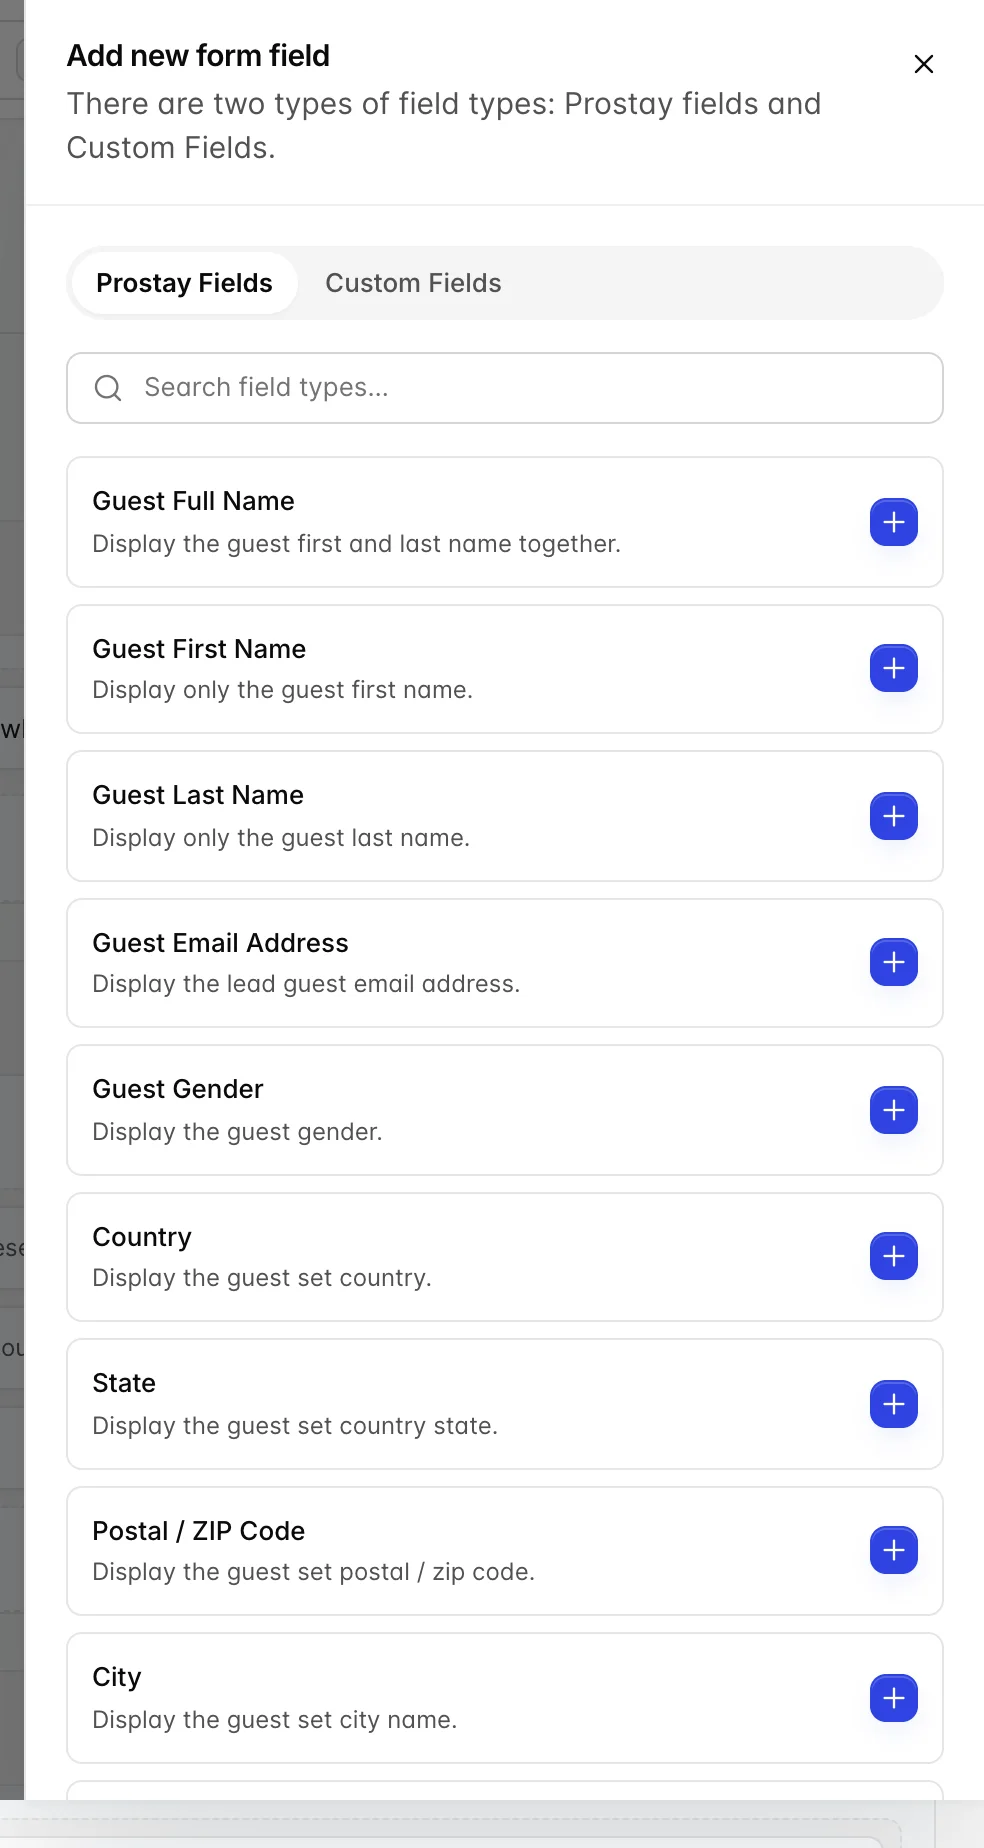
Add Field opens the catalogue, split into two tabs.
- Prostay Fields are values the system already holds: the guest, the dates, the room, the money. Each has a line under it saying exactly what it prints, and those descriptions are worth reading rather than guessing from the name. Guest Email Address, for instance, says it prints the lead guest's address, which matters on a booking with several guests.
- Custom Fields are fields your property has defined itself, on the guest or on the reservation. If you record a frequent flyer number or a dietary note, that is where it appears.
The search box is there because the list is long. Type "check" rather than scrolling.
Five fields the letter has and the card does not
The two guest documents share this catalogue almost entirely, and the confirmation letter has five extra entries the registration card does not offer:
- Payment Method
- Booking Source
- Rate Plan Name
- Items & Services, which prints a table of the extras added to the booking before arrival rather than a single value
- All Guest Names, which prints everybody on the reservation instead of just the lead guest
That difference is deliberate. These are things you tell somebody when you are confirming a booking they have just made. A registration card is signed at the desk by a guest who is already standing there, so how they found you and which rate plan they are on is not what that piece of paper is for.
Your own wording
Everything above puts the system's data on the page. Text Block is how you put your own words there, and it is the field most letters lead with: the thanks, the welcome, the line about bringing photo identification.
A text block holds formatted text rather than plain text, so it has a proper editor behind the pencil, with headings, bold, lists and links. In the builder the tile shows the words themselves rather than a label, which is why the first tile in the figure above is a whole sentence.
Title, logo and format
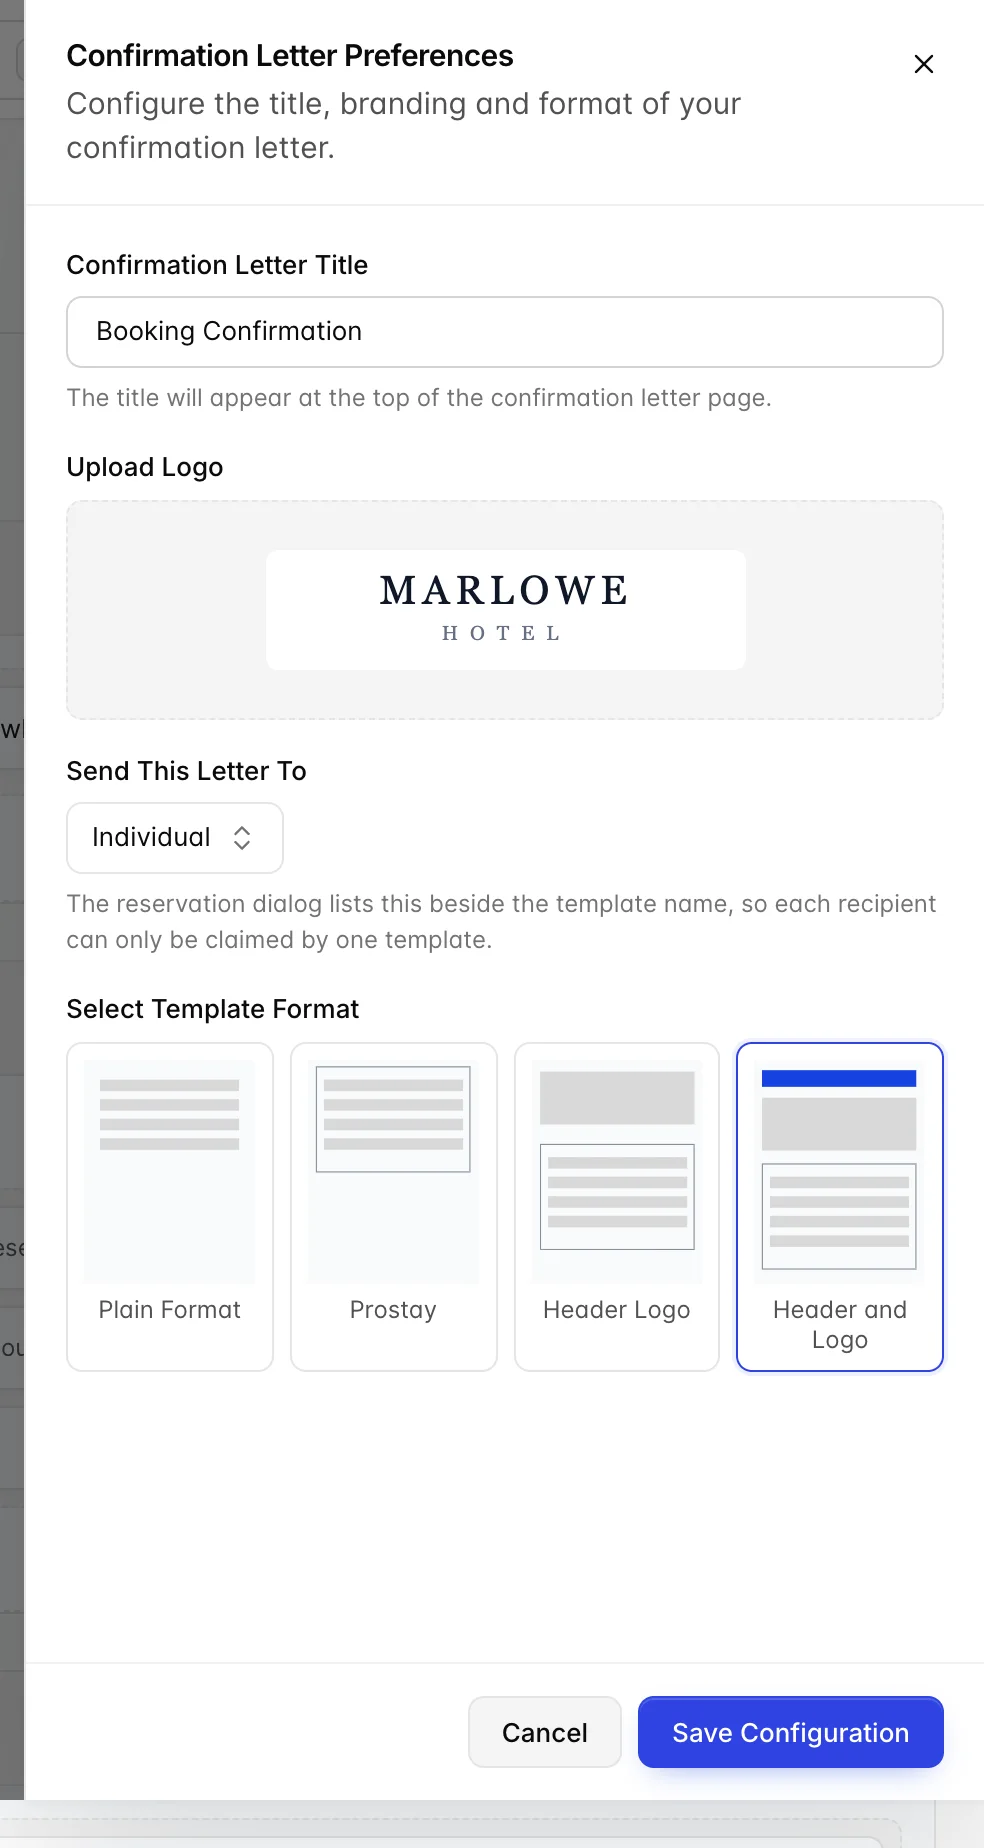
Preferences in the builder header covers how the letter is presented rather than what it contains:
- Confirmation Letter Title is the heading printed at the top of the document. It is not the template name from the list: the name is how you recognise the template, the title is what the guest reads.
- Upload Logo takes your letterhead.
- Select Template Format is four layouts, and the two words in each name tell you what you get. Plain Format has neither a header nor a logo. Prostay uses the standard layout. Header Logo puts the logo in the header, and Header and Logo puts the title there as well. If you upload a logo and it does not appear on the printed letter, this is the setting that explains it.
Who the letter is for
Send This Letter To is the busiest field in that drawer, and it is the one that connects a template to the reservation screen. Three choices:
- Individual, for the letter you send the guest.
- Agent, for the letter you send whoever booked on their behalf.
- Nobody in particular, which claims neither.
When somebody sends a letter from a reservation, each template is listed with its recipient in brackets after its name, so they can tell at a glance which one goes where. That is also why two templates cannot claim the same recipient. If you pick a recipient another template already holds, the field shows an error and Save Configuration stays disabled until you choose differently. Free the recipient on the other template first, or set this one to Nobody in particular.
Sending one from a reservation
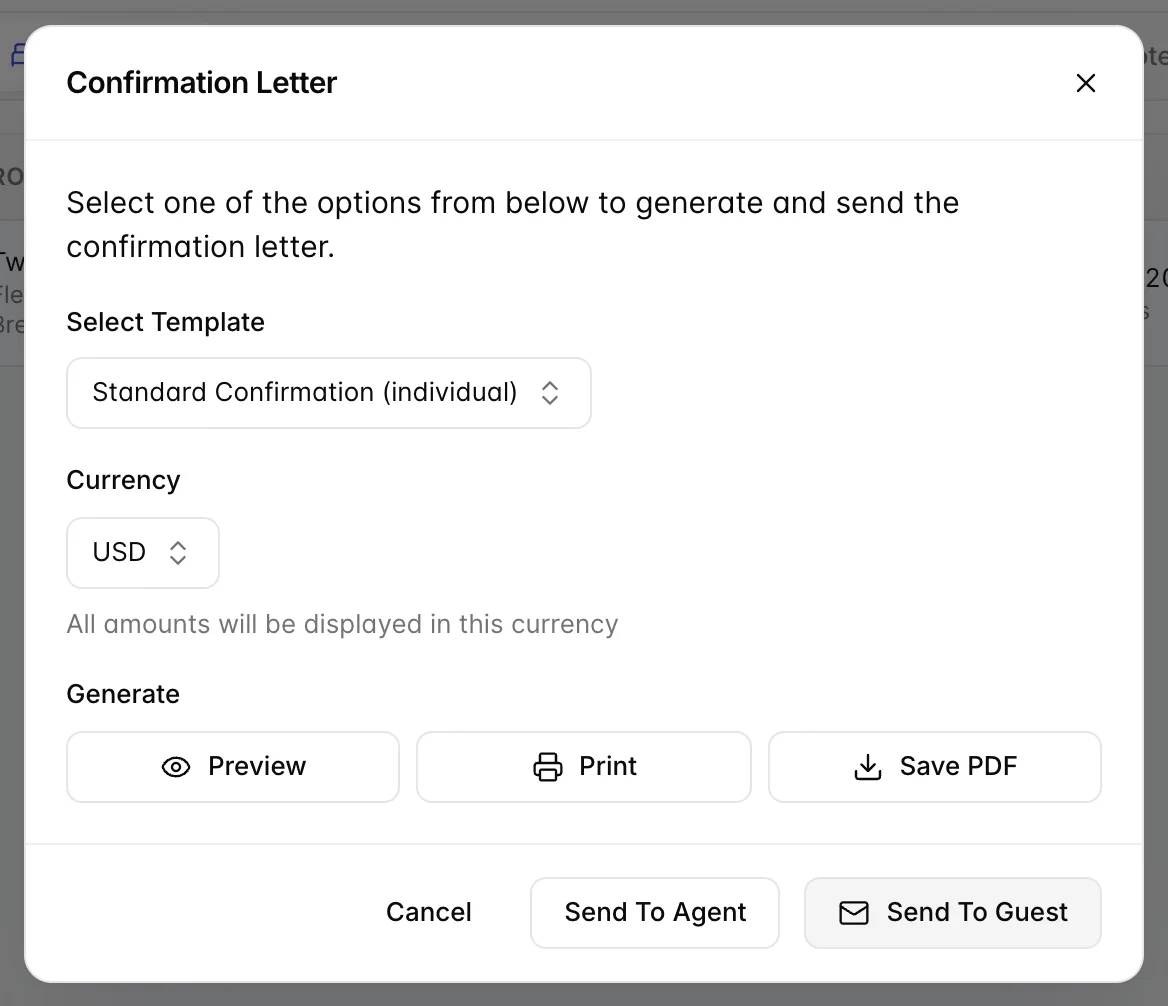
Letters are sent from the booking, not from this module. Open the reservation, then Actions, then Confirmation Letter under Create. The dialog offers:
- Select Template, showing each template with its recipient in brackets. The default is selected for you.
- Currency, which every amount in the letter is shown in. Worth a glance on a booking made in one currency and settled in another.
- Preview, Print and Save PDF, which produce the document without sending anything. Preview is the habit worth having: it is the only way to see what your template does to a real booking.
- Send To Guest and Send To Agent, which email it. Both open an email panel first, so there is a step between pressing the button and a guest receiving something.
Who can do this
Both screens are gated on the Guest module permission, which an administrator grants under Users, User Roles.
- Without it, both screens show a locked message naming the permission instead of the list, and say where to ask for it.
- With view but not edit, you can read a template but Create New, Preferences, Save Changes and the rest are disabled, each explaining why when you hover.
- Deleting a template needs the delete right specifically.
Sending follows viewing, deliberately: a front desk that should not be redesigning your letters still has to be able to send them.
Where to go next
The registration card is the same builder over a slightly smaller catalogue, and its preferences work differently in a way that catches people out. If you have just built a letter, that article is short, because this one has already done most of the work.